[NEW ZEALAND VISITOR VISA APPLICATION GUIDE FOR FILIPINOS]

My favorite country in the world, New Zealand. It’s the real-life “Middle Earth” where I experienced the most epic road trip in my life! It’s the land of Kiwis, the Maori, geysers, glaciers, alps, coastlines, mountains, fjords, and adrenaline sports. I can go on for days! This breathtaking country is just endless and I’d go back in a heartbeat.
Last December 2022, my husband (then fiance) and I applied for a New Zealand Visitor Visa for our honeymoon. We thought that the overall process was smooth and easy. And get this, the visa application fee is waived for Filipino citizens! It’s free if you only plan to visit for 59 days or less.
We were first-time applicants. We received our visa confirmation after 33 calendar days. The embassy approved us of a multiple-entry one-year visa validity. It was the best wedding gift I could ever ask for!
If you’re planning to apply for a New Zealand visa but have no idea where to start, read on. Below is my 5-step guide on how a Philippine passport holder can apply for a New Zealand visa for tourists and visitors.
Oh and by the way, every now and then I will mention “INZ”. INZ means Immigration New Zealand. They are the official government agency that manages border control, immigration, and visa issuance.
DISCLAIMER: I am not a professional travel agent and in no way affiliated with Immigration New Zealand (INZ) or New Zealand visa processing agencies. This is a personal blog. What I’ll share are guidelines and tips that worked for me. Applying for a visa is on a case-to-case basis, so nothing will ever guarantee your approval. My best piece of advice? Honesty is the best policy, always.
- About New Zealand Visitor Visa
- 5-Step Application Process
- STEP 1: IDENTIFY THE TYPE OF VISA
- STEP 2: CHOOSE HOW YOU PREFER TO APPLY
- Option 1: Online Application
- Option 2: On-Paper Application
- Option 3: Application If You’re Outside The Philippines
- STEP 3: PREPARE THE REQUIRED DOCUMENTS
- STEP 4: SUBMIT THE DOCUMENTS
- STEP 5: WAIT FOR INZ’S EMAIL
- Frequently Asked Questions (FAQs)
- 1. How long does it take for the visa to be processed?
- 2. How soon can I apply for the visa?
- 3. How much did you spend on the visa application?
- 4. Should I pay for a plane ticket to guarantee my approval?
- 5. Should I book my accommodations already?
- 6. Should I buy travel insurance?
- 7. How much money should I have in my bank account?
- 8. How long is the validity of the New Zealand Visa?
- 9. I am applying with my family (group applications). Should we prepare a separate set of documents for each member?
- 10. I have a layover in Sydney, Australia. Is the New Zealand visa valid for transiting?
About New Zealand Visitor Visa
A New Zealand Visitor Visa lets you stay in the country for a limited time. This is the visa to get if you’re a tourist on holiday or if you plan to visit friends or family staying in New Zealand.
So yes, New Zealand’s visitor visa is both a tourist and a visit visa in one! Plus, with this visa type, you can enter the country for these other reasons:
- Play sports or perform in cultural events without pay
- Enter New Zealand to get married (so dreamy)
- Undertake a short-term study of up to 3 months. For anything more than 3 months, apply for a student visa.
For Philippine passport holders, the visa application is waived if you’ll be in New Zealand for 59 days or less. Yes, it’s free! Each person only has to pay an International Visitor Conservation and Tourism Levy for Php 1,260.
5-Step Application Process
STEP 1: IDENTIFY THE TYPE OF VISA
There are several visa types for different purposes that one can apply for. Such as Study Visas, Work Visas, Family reunifications, etc.
For this guide, I will only discuss the Visitor Visa. Since it’s the one I applied for. Again, this is the visa for tourists and visiting purposes.
If you plan to apply for a different visa type, go to the official site of Immigration New Zealand.
STEP 2: CHOOSE HOW YOU PREFER TO APPLY
You have 3 main options to choose from:
- Online application
- On-paper application
- Personal Submission: Appointment or Walk-in
- Courier
- Application if you’re outside the Philippines
I’ll discuss each in detail.
Option 1: Online Application
This is obviously the more convenient choice. This is done purely online so you can do it in the comfort of your home. You just have to fill out the application form online. Then upload the required documents. The visa is in electronic format. So there’s no need to submit your actual passport to the embassy.
The work here is on scanning each page of your documents and organizing them in PDFs. Make sure that you scan a clear high-quality copy of your passport. Otherwise, INZ will ask you to go to their receiving center, VFS Global, just to show your passport.
Click the button below for the detailed steps on how to lodge your online application.
HOW TO APPLY ONLINE
1. Open the Immigration New Zealand page. On the upper right tab, click LOG IN and choose Visitor Visa from the options.


2. A drop-down option will appear at the bottom of the page. Choose Visitor Visa (General) from the list. You may need to scroll down to see this.

3. The ‘RealMe’ section will appear. Click the button LOG IN or CREATE AN ACCOUNT.
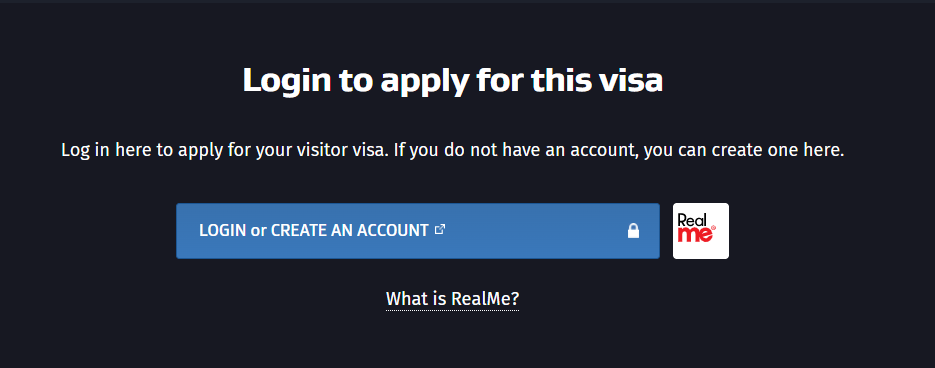
4. Set-up your RealMe account by providing the following info:
- Email address
- Username
- Password
- 3 Security questions and answers
- Proving you’re a human – enter characters you see on the picture
5. Accept the terms and conditions and click Continue
6. Accept the account security disclaimer to create your Immigration Online Profile.
*****
7. You will be redirected to the Immigration Online page. Enter your display name and your email address. Use the ones you provided in #4. Click Agree and Continue.
8. You will receive 2 emails:
- An email from RealMe saying that your Registration is successful, and
- An email from Immigration Online to verify your account. Double-check your Spam folder if you haven’t received an email.
9. To activate your account, click the Verification Link in the email from Immigration Online. Then follow the links provided to verify your account.
10. Click View My Account and then Visitor Visa to complete the online application form.
*****
IMPORTANT NOTES:
- The next pages will be forms asking about your personal information. It’s straightforward.
- You don’t need to finish the form in one seating. You can save it and answer it later.
- After 30mins of inactivity, you will be logged out. Any unsaved information will be lost.
- If you’re not sure what the question means, use INZ’s official guide when answering the application form. You can access it here.
Option 2: On-Paper Application
For On-Paper applications, the visa processing agency of New Zealand is VFS Global.
This option was my choice. Firstly, because I was applying for myself and my husband. It’d be easier for me to just have the physical copies of our documents. Rather than taking the time to arrange everything in PDFs. Secondly, this was our first time applying so I want to be advised on what to do.
For example, my husband and I went to VFS Global. Each of us brought our own application forms and set of requirements. When handing them over, the attendant asked us questions. About our relationship, or if we have the same itinerary, etc. Then she advised us that we fall under the group application category. So we should only submit one application form. And I should add my husband under my application.
VFS Global charges a processing and handling fee of Php 1,160 for each application. Again, this is per application – not per person. Since we’re under one application, we only paid Php 1,160.
With this option, you can either submit your documents personally by going to VFS Global Manila or Cebu. Or you can send your documents through courier.
Click the button below for the detailed steps on how to apply personally and through courier.
PERSONAL SUBMISSION: BY APPOINTMENT OR WALK-IN
For personal submission, you can either schedule an appointment or simply walk-in.
APPOINTMENT
1. To schedule an appointment, go to the New Zealand VFS Global page. Click Book Now.
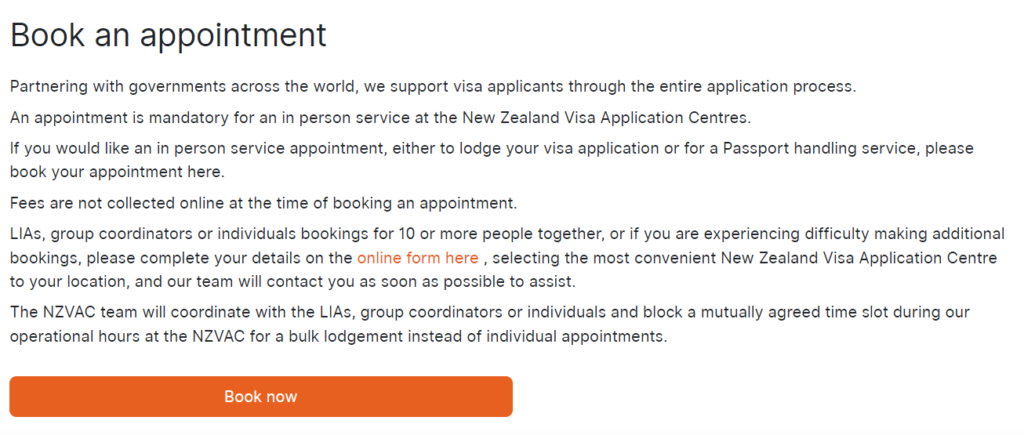
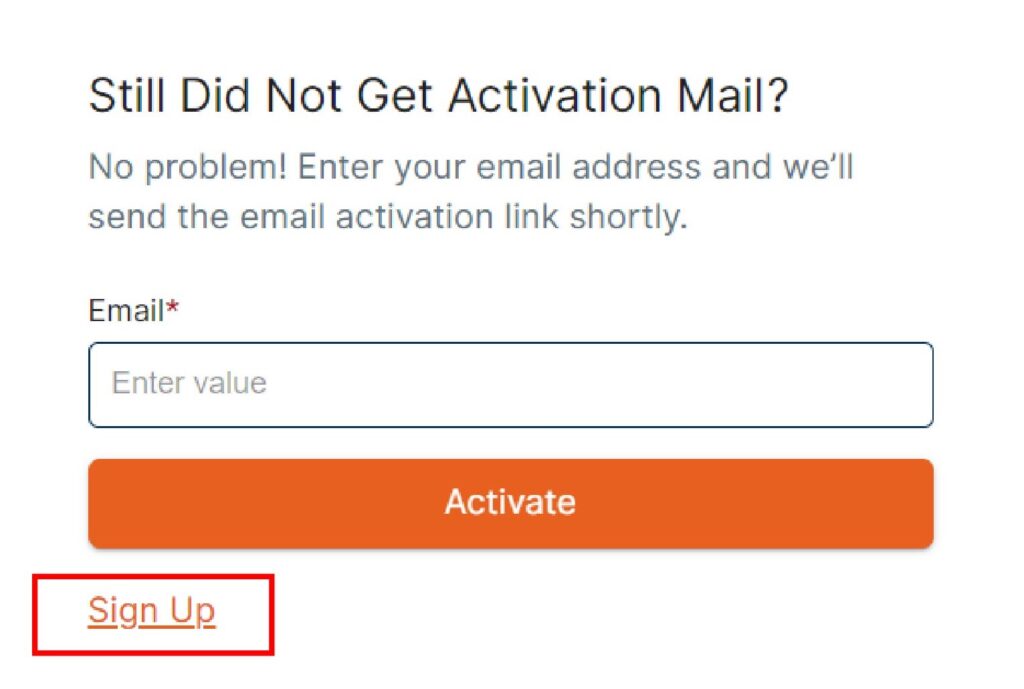
2. On the Sign-In box, click Activate my Account below.

3. Click the Sign Up link below.
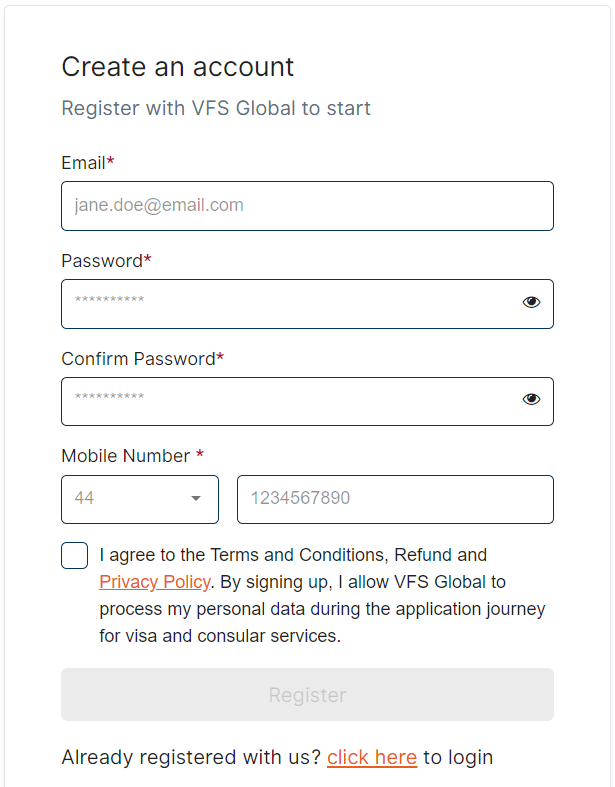
4. Create your VFS Global Account and fill out the fields. Then Register
*****
WALK IN
For walk-ins, you can go ahead to VFS even without an appointment. You just need to pay for an additional Php 636 premium appointment fee, on top of the Php 1,160 VFS handling fee. Again, these fees are per application, and not per person.
In our case, we just walked in. There was no queue when we got to VFS. We were done in just 30 minutes.
*****
Authorized Representative
Note that in case you can’t go to VFS, you can have an authorized representative go there on your behalf. The representative of the applicant must show an authority letter confirming this arrangement. With signature copies of the IDs of the applicant/s and the representative.
COURIER
The courier fee is Php 380, which is on top of the VFS handling fee of Php 1,160. Again, these fees are per application, and not per person.
- Choose any courier that you prefer: LBC, Air21, 2GO, etc.
- Submit your required documents with your passport. Make sure that your passport has your signature on page 3.
Yes, you have to submit your actual passport but don’t worry, VFS will deliver it back to you. On a piece of paper, along with your documents, write your return address and the type of visa that you applied for.
VFS Global Manila and Cebu’s complete postal address are in Step #4 below.
The complete address of VFS Global Manila and Cebu is at Step #4. Just submit your set of requirements to them. Then they will scan everything for you and lodge your application online.
If you have queries on the application process, contact VFS Global: 028-528-2504. This is their line for New Zealand applications. They are responsive to all queries. They also accommodate questions about answering the application form and requirements.
Option 3: Application If You’re Outside The Philippines
If you’re residing abroad, you also have the option to apply either online or paper-based.
Click the button below to know more about how to apply for a visa from your current location.
HOW TO APPLY IF YOU’RE OUTSIDE THE PHILIPPINES
1. Visit the INZ page for the center finder.
2. Go to the drop-down option at the middle of the page. It’s under ‘Fees and Receiving Centre‘. Select Visitor Visa.


3. Select the Philippines for your passport and enter your current location. For example, you’re currently residing in Singapore.
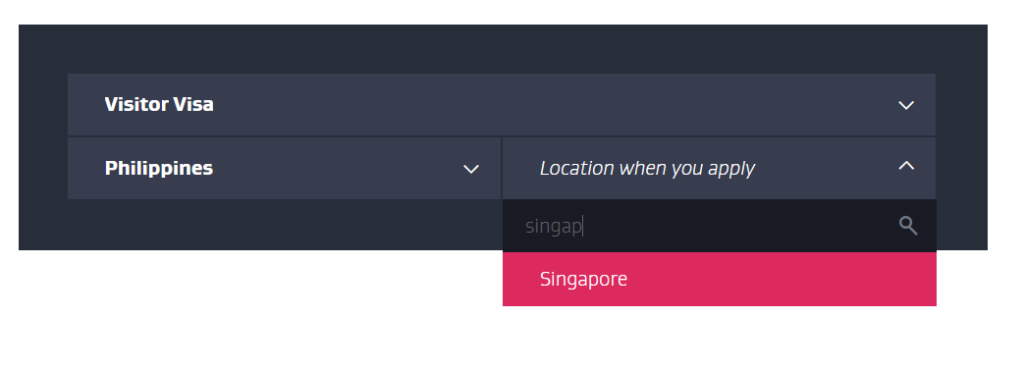
4. Select your preferred application: Online or On Paper. And choose How Many People are Included in the Application. Then select View Fees and Receiving Centre.
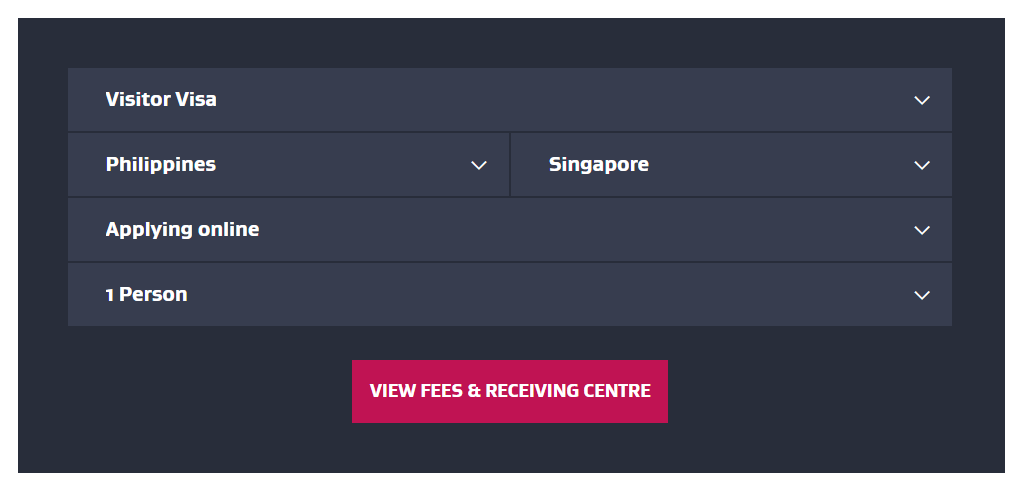
And that’s it! The page will show you the following information:
- Fees
- Processing time
- Receiving center details
- Payment method
- Contact and hours
*****
For the online application, the process is the same with PH-based applicants.
Click the How To Apply Online button from Option 1.
Those are the options! Which mode of application is more convenient for you?
STEP 3: PREPARE THE REQUIRED DOCUMENTS
I listed below everything that I submitted to the embassy. It may sound overwhelming for first-time applicants so I wrote a separate guide explaining each item off the list. Check out my comprehensive New Zealand Visitor Visa Requirements guide. It has every document that I submitted. I also have a list of suggested documents that may be relevant to you.
Here’s the list as required by INZ:
- Completed visitor visa application form or form INZ 1017
- Passport (with signature on page 3)
- Two-passport sized color photos
- Medical Certificate (for those who’ll stay for more than 6 months)
- Evidence of financial support
- If sponsored – Sponsorship form for Temporary Entry or INZ 1025
- If self-funded – financial documents in your name (bank certificate, bank statements, credit card statements etc.)
- Evidence that You Have the Means to Leave New Zealand
- Have a ticket out of New Zealand
- Evidence that you have the money to buy one
- Evidence of Relationship with your travel companion
- Supporting documents: evidence that you are a bona fide visitor (strong ties, employment, tourism activities, etc.)
As you’ve noticed, INZ used the word ‘evidence’. It’s because they aren’t too specific with the documents. So it’s entirely up to you how you can show them that you’re financially capable. Or that your intention is purely sightseeing or visiting.
The good news is there are a lot of documents that you can submit! I have a separate blog dedicated just for the New Zealand visa requirements. Make sure to read it too!
STEP 4: SUBMIT THE DOCUMENTS
If you opted for online application, the entire application is done purely online.
To upload your documents, scan each page then arrange and organize them in PDFs. Paste the scanned copies of your documents or images using MS Word. Then ‘Save As’ PDF. Tip: Make sure to include a cover page for each section to keep it organized.
If the PDF file is too large, compress it to keep it below 10MB.
*****
Since we chose on-paper application, we had to submit our documents in person.
When we went to VFS Global Makati, there was a long line on the ground floor. But that’s for the Schengen visa applicants because their processing is in the same building. So we went past the line and informed the guard that we were there for New Zealand. There was no queue for New Zealand so the guard asked us to go ahead up. We were entertained as we arrived. Done in just 30 minutes!
Physical and Postal Address:
Manila
New Zealand Visa Application Centre
Mezzanine Floor, Unit M01, Ecoplaza Building
2305 Chino Roces Avenue Extension
Makati City, Metro Manila 1231
Open Monday to Fridays
Application lodgement: 07:00 to 14:00
Passport collection: 14:00 to 15:00
Cebu
New Zealand Visa Application Centre
9th Floor Keppel Centre
Samar loop corner Cardinal Rosales Avenue
Cebu Business Park, Cebu City 6000
Open Monday to Fridays
Application lodgement: 07:00 to 13:00
Passport collection: 14:00 to 15:00
STEP 5: WAIT FOR INZ’S EMAIL
After submitting your documents, the only thing you can do is to wait.
They will only contact you if:
- They need more documents for you to submit or;
- To let you know whether your application is approved or not
Here’s the timeline of our application process:
12/14/22: Date of application and submission of requirements to VFS Global, Makati
12/16/22: We received an email from INZ that they received our application
01/18/23: We received an email from INZ that our visa was approved. Yey!
The overall processing duration was 33 calendar days. Keep in mind that the processing time varies.
My husband and I were in a group application. Since I was the primary applicant, I was the only one who received the email confirmation. My husband didn’t receive anything. But his name and passport details were stated on the confirmation letter. Make sure to print this letter when you travel.
The visa itself is in an electronic format. The visa will automatically reflect on the system records as you travel. They don’t use a sticker or a visa label for the passport.
And you’re done!
If you have any questions, leave a comment below and I’ll try to answer the best I can.
Frequently Asked Questions (FAQs)
1. How long does it take for the visa to be processed?
The processing duration is on a case-to-case basis.
For us, it was 33 calendar days.
The time for them to decide on visa applications depends on the following:
- The complexity of the application
- Whether or not further information will be asked/is needed
- The number of other applications INZ received
2. How soon can I apply for the visa?
New Zealand doesn’t have a specific rule or timeline on when you can submit your application. So it’s up to you. To be safe, 6 months prior would be a good rule of thumb so you can be more flexible with your plans.
3. How much did you spend on the visa application?
Visa Processing – Free
International Visitor Conservation and Tourism Levy: Php 1,260
VFS Global Handling fee: Php 1,600
VFS Global Walk-in fee: Php 636
Total: Php 3,496
4. Should I pay for a plane ticket to guarantee my approval?
If you are confident with your documents, then I would highly suggest that you buy a plane ticket. Part of the requirements listed by the INZ is to have a pre-purchased travel ticket outside of New Zealand. In this way, you can establish that you’re a bona fide visitor who plans to leave New Zealand at the end of your stay.
As an alternative, you can also submit a flight ticket reservation. And show strong proof of financial documents that you are capable to purchase a travel ticket out of New Zealand at any time.
5. Should I book my accommodations already?
You don’t have to yet. It’s not specifically stated on the list of requirements.
But the limited accommodations in New Zealand book out so fast. Especially the towns in South Island. So we had to book ours already.
6. Should I buy travel insurance?
This is not listed as a required document by the INZ. But to strengthen our application, we bought travel insurance for our travel dates. We included it under the “Evidence of Bona Fide Visitor” documents.
Also, we would need the insurance for a road trip 100% haha! #SafetyFirst
7. How much money should I have in my bank account?
There’s no specific answer to this, but personally, my safe amount would be at least 6-digits worth. Not including airfare. Make sure that the amount reflects on your ADB (average daily balance).
As stated on the INZ website, the minimum financial requirement is at least NZ$1,000 or Php35,000 per month. This is for each of the persons included in the application. This is only for your day-to-day expenses when you get to New Zealand. The money for buying your flights in and out of New Zealand shouldn’t be included.
If you have someone to sponsor your trip, the financial burden will shift to your sponsor so he/she will need to show financial capacity documentation.
8. How long is the validity of the New Zealand Visa?
We were approved for 1-year validity. I’m not too sure if it’s the commonly approved validity duration.
9. I am applying with my family (group applications). Should we prepare a separate set of documents for each member?
For families and partners, the application will be treated collectively.
For example, my then-fiance and I applied together. We have the same itinerary, flight, accommodation, etc.
So we only had to submit one application form. In the same application form, there’s a section where I can add my travel companion and my relationship with him. For the ‘shared’ documents like accommodations, car rental in New Zealand etc., we only submitted one. But for the personal documents such as bank accounts, we submitted our own.
10. I have a layover in Sydney, Australia. Is the New Zealand visa valid for transiting?
No. An Australian transit visa is different. But we didn’t need one because we didn’t layover in Sydney for more than 8 hours. No overnight layovers or anything like that. Also, Qantas Airways brought our pieces of luggage from Manila straight to New Zealand. So make sure to check how your chosen airlines will handle your luggage.
To know more about ‘Travelers eligible to transit without a visa in Australia‘, here’s the notice from the Australian government.
*****
In summary, here are the links mentioned in this article:
- New Zealand Visa Requirements – My detailed blog on documents to submit
- Immigration New Zealand – Official website
- INZ 1017 – Visitor Visa Application Form for Temporary Stay (Tourists and Visitors)
- INZ 1018 – Visitor Visa Guide: A Guide to Applying for a Visitor Visa
- INZ 1025 – Sponsorship Form for Temporary Entry
- VFS Global Visa Appointment – Book an appointment for New Zealand applications
- New Zealand Office or Center Finder – For applicants outside the Philippines